
I have a love/hate relationship with sewing straight pins. Obviously, I LOVE how they hold all of your fabric, interfacing, and patterns in place while you cut or sew. However, there is a feature about straight pins that I absolutely HATE. If you guessed that they’re sharp you’d be right! I can’t begin to tell you how many times I’ve poked myself with straight pins and once I jammed one under my fingernail (so painful)! Another thing that straight pins have against them is that they can damage sensitive material such as faux leather, plastic, or vinyl.
So, I get that there are times when you absolutely have to use straight pins in sewing. BUT I also know that there are perfect instances where fabric pattern weights would work better. To be honest this is not a new revelation I’ve just never really gotten around to making any. So, I told myself this is the time to come up with a super cute DIY pattern weight to use when straight pins don’t make sense. I wanted to make something that looked like the vintage toy Weebles but when these cute pattern weights were finished they looked more like a Hershey’s Kiss (I’m cool with that as long as they are the almond kind!).
This post contains affiliate links. That’s just a fancy way of saying if you click on a link and purchase something I get a little money (total score for me). For more information, see my disclosure here.
What You Need!
- Canvas Cotton
- Lightweight Fusible Interfacing
- Mini Carabiner Hook ~ Optional
- Rice or Bean Bag Filling Pellets
- Funnel
- Matching Thread
- Free #45 ~ DIY Pattern Weights Printable Pattern ~ Available in The Pattern Stash! Head on down to the bottom of the page, fill out the form, and instantly receive an email with the password!
FYI! Did you know you can get a printer friendly PDF of the DIY pattern weights tutorial that prints without ads? Just head over to The It’s So Corinney Shop and check it out!
FYI!
- All sewing is done with a 1/4 inch seam allowance.
- The finished size of these pattern weights are 2 1/4 inches tall and 2 inches wide.
Important Info!
When printing the sewing pattern PDF make sure to adjust the print settings. After you click on the print button in the PDF the printer dialog box will come up. On this screen you want to change the default zoom page size to be Actual Size. If you don’t change this setting then the pattern will print smaller then intended (so sad!).

What To Do!
To begin the DIY pattern weights you need to download the free pattern from The Pattern Stash. Before you cut the pattern pieces out of the canvas fabric press the fusible interfacing to the back of the fabric. Then cut out the side and base patterns out of the fabric that has the interfacing on it. The tab pattern gets cut out of a non-interfacing piece of fabric.

Next, press the tab piece in half lengthwise with wrong sides touching.

Then open up the tab piece and push the two sides towards the center and press.

Next, fold the tab piece back together and press.

Then top stitch down both long sides of the tab.

FYI! Did you know you can get a printer friendly PDF of the DIY pattern weights tutorial that prints without ads? Just head over to The It’s So Corinney Shop and check it out!
Next, fold the tab in half and pin on the flat side of the half circle 1 1/4 inch from the right side edge.

Then fold the half circle in half and pin. Make sure to move the tab pin once you have the top pin inserted or your machine could hit it.

Next, sew across the flat side of the side piece. I like to sew it at least twice for added strength.

Then carefully cut off the tip of the triangle being sure to not cut the seam.

Next, flip your cute DIY pattern weight right side out. Then move the seam to the center like shown below and finger press flat.

Next, flip the pattern weight to the front and trim the back piece to be even with the front piece.

FYI! Did you know you can get a printer friendly PDF of the DIY pattern weights tutorial that prints without ads? Just head over to The It’s So Corinney Shop and check it out!
This is what it should look like after trimming.

Then flip your side piece back wrong side out. Then fold the side piece in half one way then in half the other way to make marks where 1/4 of the side is. You could also measure but I’m not a huge fan of measuring.

Next, fold the base circle in half then in half again. This will create marks where 1/4 of the circle is located.

Then match up the 1/4 marks on the sides of the DIY pattern weight to the base. I like to really over pin so nothing slips! Please note that the side piece is slightly smaller than the base which is totally intentional!

Next, sew around the edge of the pattern weight leaving a 1/2 inch turning hole. Make sure to put the turning hole towards the back of the weight but not where the side seam is located.

FYI! Did you know you can get a printer friendly PDF of the DIY pattern weights tutorial that prints without ads? Just head over to The It’s So Corinney Shop and check it out!
Then take your scissors and point cut around the pattern weight except where the turning hole is. Make sure to not cut any of your stitches!

Next, flip the pattern weight right side out using the turning hole.

Then press out all of the seams of the DIY pattern weight really well! I use a plastic chopstick to do this.

Next, fold under the turning hole towards the inside of the pattern weight.

FYI! Did you know you can get a printer friendly PDF of the DIY pattern weights tutorial that prints without ads? Just head over to The It’s So Corinney Shop and check it out!
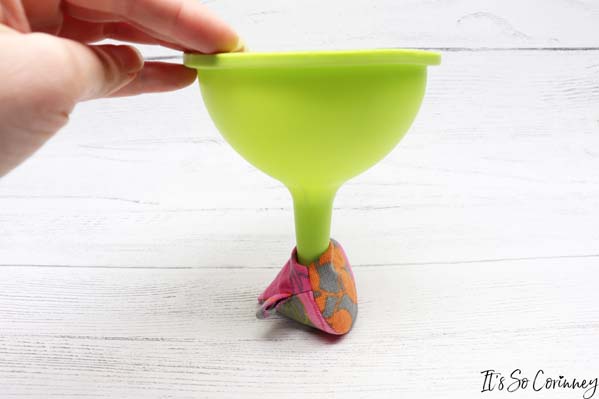
Then using a funnel put rice or bean bag pellets into your pattern weight. I like to add as much as I can possible fit so the pattern weight is super sturdy.
Next, you just need to whipstitch the turning hole closed and you’re all done!

So, I love these little DIY pattern weights so much I made one in every color of canvas fabric I had on hand! And……. to keep them together I just slipped a mini carabiner hook through the tabs and now they will never be far away from each other!

Now aren’t these a cute and easy way of holding patterns and sensitive fabrics down? These little guys are so handy to have around I even use them as paper weights while I’m working in the office!
Would you like a printer friendly PDF of the DIY pattern weights tutorial that prints without ads? Then head over to The It’s So Corinney Shop!

Pin Me!

Want To Up Your Sewing Skills?

Are you ready to stop putting off sewing projects and gain confidence in sewing? This instant download digital book comes with over 50 pages of sewing knowledge to help you gain confidence in your sewing! Also included is 5 bonus printable sheets to help you keep your sewing projects and supplies more organized!
Love The Craft Tutorials On The Blog?

Do you enjoy the craft tutorials on the It’s So Corinney blog? If so, would you consider leaving a tip to help me keep the blog going? Your generous support would help me purchase more craft supplies and caffeinated products to create new and exciting craft tutorials to share with you!


Can’t wait to make them!!!
I’m so glad! I had a blast making this pattern!